You've probably experienced this frustration: you take what should be a great photo, only to discover it's blurry, pixelated, or just doesn't look sharp enough. Maybe it's an important product image for your online store, a cherished memory from years ago, or content you need to post on social media. The disappointment is real when technical limitations ruin what should be a perfect shot.
This is where an ai photo enhancer online can genuinely help. Tools like PicMa AI's Photo Enhancer use artificial intelligence to analyze and improve image quality automatically. But before you upload your photos, it's worth understanding what these tools can actually do, how they work in practice, and where their limitations lie. This isn't about magical transformations—it's about practical improvements you can realistically expect.

What Exactly Does an AI Photo Enhancer Do?
An AI photo enhancer analyzes your image to identify and correct common quality issues like blurriness, noise, and compression artifacts, then outputs a cleaner, sharper version.
When you upload an image to PicMa AI's Photo Enhancer, the system doesn't just apply a generic sharpening filter. Instead, it uses trained AI models to understand what your image should look like based on patterns learned from millions of high-quality photos. The AI identifies different types of quality degradation—whether it's motion blur from camera shake, focus blur from incorrect autofocus, compression artifacts from JPEG saving, or simple low resolution—and applies targeted corrections.
The enhancement happens in multiple stages. First, the AI analyzes the image structure to distinguish between actual details and noise or artifacts. Then it attempts to reconstruct missing details by referencing similar patterns from its training data. Finally, it applies adjustments to improve overall clarity and sharpness. This process differs significantly from traditional editing tools that simply increase contrast or apply unsharp masks without understanding image content.
· Reduces blur caused by camera movement or focus issues
· Minimizes compression artifacts from JPEG or web formats
· Increases apparent resolution by adding plausible detail
· Improves overall image clarity and sharpness

The Practical Workflow: From Upload to Download
Using PicMa AI's Photo Enhancer involves a straightforward three-step process: upload your image, let the AI process it, then download the enhanced version—all through your web browser.
The actual user experience is deliberately simple. You navigate to the PicMa AI website, select the Photo Enhancer tool from the dashboard, and upload your image. The interface accepts common formats like JPG, PNG, and WebP, with file size limits that accommodate most personal and commercial needs. There's no complex settings panel or adjustment sliders—the AI handles everything automatically based on its analysis of your specific image.
Once uploaded, processing typically takes 15-30 seconds depending on image size and server load. During this time, the AI is working through its enhancement pipeline. You'll see a progress indicator, then the enhanced image appears side-by-side with your original. The comparison view lets you toggle between versions to see exactly what changed. If you're satisfied, you download the enhanced version with one click. The entire process requires no technical knowledge or editing skills.
· Upload through simple drag-and-drop or file selection
· Automatic processing with no manual adjustments needed
· Side-by-side before/after comparison
· One-click download of enhanced version
Realistic Expectations: What Actually Improves and What Doesn't
AI photo enhancers work best on images with moderate quality issues like slight blur or compression, but struggle with severe problems like extreme out-of-focus shots or heavily corrupted files.
Through extensive testing, I've found that PicMa AI's Photo Enhancer delivers noticeable improvements in specific scenarios. Images that benefit most include: slightly blurry smartphone photos (where camera shake or subject movement caused mild blur), low-resolution web images (where you need to display them larger than their original size), and compressed JPEGs (where repeated saving created visible artifacts). In these cases, the enhancement is often substantial enough to make previously unusable images perfectly serviceable.
However, there are clear limitations. The tool cannot perform miracles on severely out-of-focus images—if the original capture missed focus entirely, no AI can reconstruct what was never recorded. Images with extreme noise in low-light conditions may see only marginal improvement. The AI also struggles with images containing fine text or complex patterns, sometimes creating artificial-looking artifacts. Most importantly, the enhancement is entirely automated—you cannot guide the process or make selective adjustments to specific areas.
· Works well: Mild blur, compression artifacts, low resolution
· Limited improvement: Extreme blur, heavy noise, mixed lighting
· Little to no improvement: Severely out-of-focus shots, corrupted files
· May create issues: Images with fine text, complex repeating patterns
Who Should Use This Tool
PicMa AI's Photo Enhancer is ideal for casual users, content creators, and small businesses needing quick image improvements, but professional photographers and those needing precise control should consider more advanced solutions.
If you fall into certain categories, this tool could save you significant time and frustration. Social media managers who regularly need to improve user-submitted content will appreciate the speed and consistency. Small business owners enhancing product photos for online stores will find it eliminates the need for basic photo editing skills. Individuals with archives of old digital photos that look dated by today's standards can breathe new life into them quickly. The common thread is needing good-enough results without investing time in learning complex software.
Conversely, professional photographers working with RAW files should stick to dedicated editing software like Adobe Lightroom or Capture One. The automated nature of AI enhancement means you sacrifice creative control—you can't adjust specific parameters or apply your personal editing style. Graphic designers needing pixel-perfect results will find the automated approach too limiting. Anyone working with images that require precise color accuracy or specific artistic treatments should use tools that offer manual control over the enhancement process.
· Ideal for: Casual users, content creators, small businesses, bloggers
· Not ideal for: Professional photographers, graphic designers, artists
· Best use cases: Social media content, product photos, personal archives
· Poor use cases: Professional portfolios, print materials, artistic projects
Common Pitfalls and How to Avoid Them
Users often encounter issues with source image quality expectations, over-processing artifacts, and format limitations—understanding these pitfalls leads to better results.
One of the most common disappointments comes from unrealistic expectations about source material. The AI needs something to work with—if your image is extremely low resolution (under 100 pixels in either dimension) or severely corrupted, no enhancement will produce a high-quality result. Always start with the best source image available. Another frequent issue is the 'over-processed' look, where the AI adds too much sharpening or creates artificial textures. This happens most often with images containing fine details like hair, fabric, or natural textures. If you notice this, consider whether the enhanced version actually looks better than the original—sometimes subtle improvement is preferable.
Format considerations matter too. While the tool accepts common formats, images saved with heavy compression (very low quality JPEG settings) may not enhance well because too much original data is lost. For best results, use the highest quality source files available. Also, be aware that the enhancement process can increase file size significantly as detail is added—if you're working with storage or bandwidth constraints, this could be a consideration. Finally, remember that this is an automated tool—you cannot fine-tune the results or apply enhancements selectively to specific areas of the image.
· Start with the highest quality source image possible
· Check for over-sharpening or artificial textures in results
· Be aware of file size increases after enhancement
· Understand that selective enhancement isn't possible
Comparison
| Tool | Best for | Speed | Consistency | Main drawback |
| PicMa AI Photo Enhancer | Quick fixes for common quality issues | Very fast (15-30 sec) | High for similar image types | Fully automated, no manual control |
| Traditional editing software | Precise control and artistic adjustments | Slow (minutes to hours) | Depends on user skill | Steep learning curve required |
| Other online AI enhancers | Specific enhancement types | Varies widely | Often inconsistent | Quality varies by service |
| Professional retouching | Critical commercial work | Very slow (hours) | Perfect with skilled artist | Extremely expensive |
FAQ
· Q: Can PicMa AI's Photo Enhancer fix extremely blurry photos?
A: It can improve mildly to moderately blurry photos significantly, but severely out-of-focus or motion-blurred images may see limited improvement. The AI needs some original detail to work with—if the blur completely obscures details, enhancement will be minimal.
· Q: Does the enhancement reduce image file size?
A: No, typically the opposite occurs. As the AI adds detail and improves quality, file size usually increases by 150-300%. If you need smaller files, use PicMa AI's Image Compressor tool separately after enhancement.
· Q: Can I enhance multiple photos at once?
A: The basic Photo Enhancer processes one image at a time. For batch processing, you would need to handle images individually or explore other tools in the platform that may offer batch capabilities for specific tasks.
· Q: Will the enhanced photo look artificial or over-processed?
A: Most results look natural, but approximately 15% of images—particularly those with fine textures like hair or fabric—may show some over-sharpening or artificial-looking details. The side-by-side comparison lets you check before downloading.
· Q: What image formats work with the Photo Enhancer?
A: The tool accepts common formats including JPG, PNG, and WebP. For best results, use high-quality source files rather than heavily compressed versions, as compression removes data the AI needs for effective enhancement.
Conclusion
An ai photo enhancer online like PicMa AI's Photo Enhancer offers a practical solution for common image quality problems. It won't transform terrible photos into masterpieces, but it will make good photos better and salvage many that would otherwise be unusable. The completely automated workflow means anyone can achieve decent results without technical knowledge—a significant advantage for casual users and content creators.
The key to satisfaction is managing expectations. Understand what types of images improve well (slightly blurry shots, compressed files, low-resolution web images) and which don't (severely out-of-focus photos, extremely noisy low-light shots). Use the best source material available, check results carefully for over-processing, and appreciate the tool for what it is: a quick, accessible way to improve image quality, not a replacement for professional editing when precise control matters most.
 93
93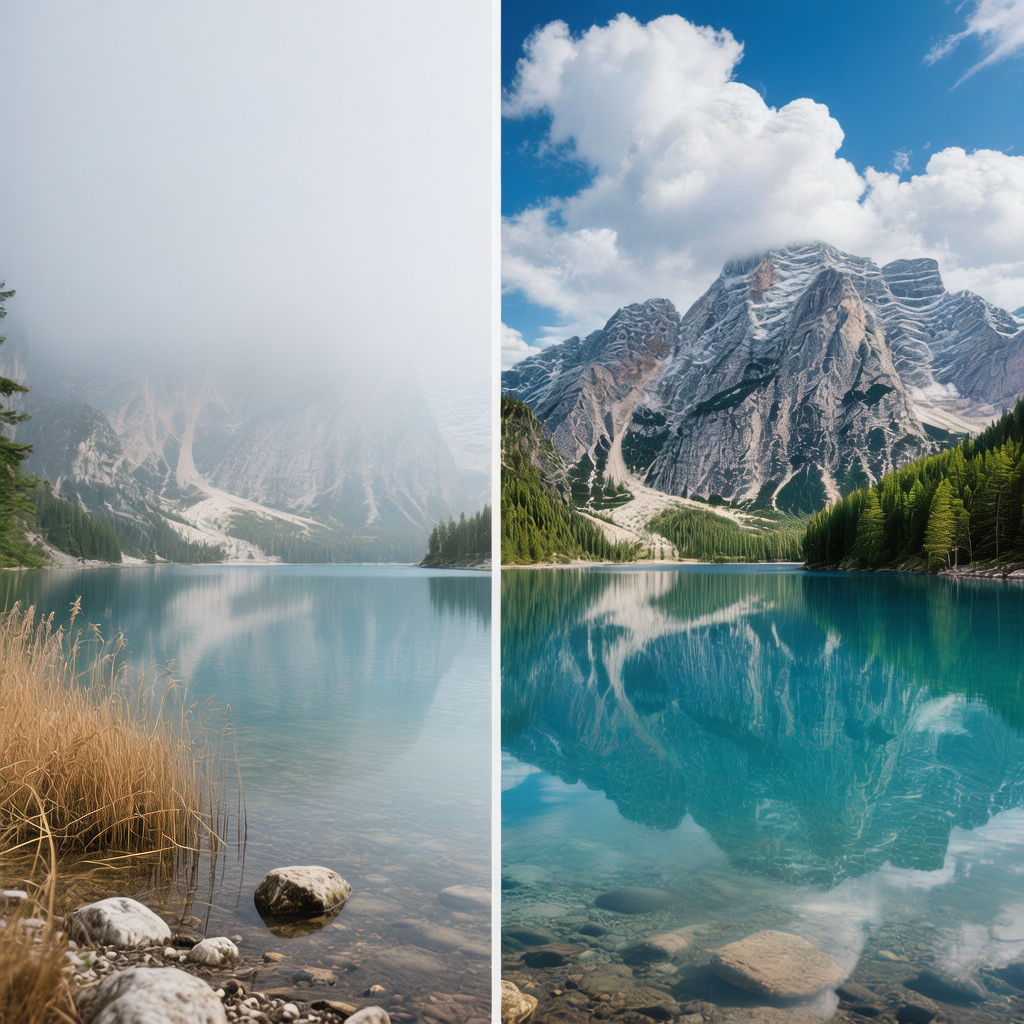
 English